In an earlier post we looked at how routing requests through proxy servers could help with content retrieval for some sites. We also showed you how to enable proxy use in our Feed Control service for feeds that need it.
In this post we’ll look at how to configure the self-hosted versions of our Feed Creator and Full-Text RSS software to use proxy servers.
Storm Proxies as proxy provider

You can use any proxy service provider you like, but in this guide we’ll be using Storm Proxies, specifically its Dedicated Rotating Proxies. That’s what we use in our Feed Control service and it’s worked well for us for the feeds which have needed proxy routing. (If you encounter feeds that need a more specialised solution, you can still follow these steps but enter the details associated with whatever service you choose to use.)
With this particular service Storm Proxies requires you use IP authentication, so the IP address belonging to your server hosting our software needs to be registered in your Storm Proxies account.
If you’ve set up our software on a VPS server, you’ll be able to find the IP address of the VPS server in your account. That’s what you’d enter in the Authorized IPs field.
Depending on the package you purchase from Storm Proxies, you will be able to enter between 1-5 IP addresses in this field. The cheapest package ($14/month) only allows 1 IP address and 10 simultaneous connections. If you’re running our software on a single VPS and can ensure the feeds won’t all be requested simultaneously in a way that exceeds the 10 simultaneous connections limit, this package will work fine. Otherwise Storm Proxies offer bigger packages that increase the number of simultaneous connections and IP addresses.
Proxy configuration in Full-Text RSS/Feed Creator
Both Full-Text RSS and Feed Creator allow you to configure how proxy servers are used with each application, these include:
- Never use proxy
- Always use proxy
- Only use proxy when
&proxyrequest parameter is used
A proxy server should only be needed in situations where a direct connection doesn’t work (see our previous post for more details), so we recommend option 3 above. To enable that mode, you’ll want to edit the config file for Full-Text RSS/Feed Creator.
Best practice for both applications is to set up a custom config file (instructions in the README.txt file distributed with each application) so that future updates to the software don’t overwrite your settings.
There are 3 configuration options in the config file that you’ll want to edit. Let’s go through them one by one.
Step 1: Enter proxy server IP and port
After you create your Storm Proxies account, you’ll be given an IP address and port number. You’ll actually be given a set of 3 IPs: Main gateway, 3-minute gateway, 15-minute gateway.
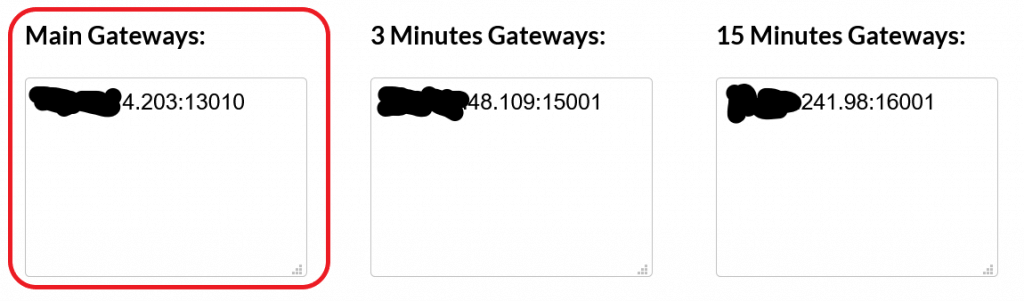
We recommend using the main gateway IP in our software.
$options->proxy_servers = ['stormproxies' => ['host' => 'x.x.x.x:xxxxx']];Make sure to edit the above and replace ‘x.x.x.x:xxxxx’ with the IP address and port (number after the colon) for the main gateway displayed in your Storm Proxies account.
If you’re using a different proxy service that requires username and password for authentication, you can add that with the ‘auth’ key, e.g.: ['host'=>'x.x.x.x:xxxxx', auth'=>'user:pass']
Step 2: Disable proxy use by default
We don’t want the proxy server to be used for every request, so let’s disable it by default.
$options->proxy = false;Step 3: Allow proxy use per request
But we do want to be able to indicate that the proxy server should be used for certain requests, so we want to enable proxy override.
$options->allow_proxy_override = true;Using the proxy service
With the above changes, you won’t notice any difference when using Feed Creator or Full-Text RSS, and won’t see an option for choosing a proxy server from the interface of either application.
To indicate that the proxy server you entered should be used, you will need to change the feed URL generated by Full-Text RSS or Feed Creator and add &proxy=stormproxies as a request parameters.
Full-Text RSS example
.../full-text-rss/makefulltextfeed.php?url=example.org%2Ffeed&proxy=stormproxies
Feed Creator example
.../feed-creator/extract.php?url=example.org...&proxy=stormproxies
Failing requests?
When using a rotating proxy service, the results can be hit and miss because requests are routed through different servers. If something doesn’t load, try refreshing to route through a different server. Feeds are intended to be polled regularly for updates, so the occasional failing request shouldn’t be of concern.
In Full-Text RSS, however, if content cannot be retrieve (due to an extraction, connection, or proxy failure) the feed item will still be returned, but with a message [unable to retrieve full-text content]. When using a rotating proxy, you will probably want to tell Full-Text RSS to exclude items that cannot be retrieved, because a future attempt through a different server might succeed. To do that, add the parameter: &exc=1:
.../full-text-rss/makefulltextfeed.php?url=example.org%2Ffeed&proxy=stormproxies&exc=1
This can also be enabled via the Full-Text RSS interface by selecting ‘remove item from feed’ in the ‘If extraction fails’ field.
More than one proxy service?
To use different proxy services for different feeds, you can enter more in the configuration file and give each one a unique name. Then pass the name of the proxy service that should be used in the proxy request parameter. So some feeds might have &proxy=proxy1 and others &proxy=proxy2.
Here’s how the configuration might look:
$options->proxy_servers = [
  'proxy1' => ['host' => 'x.x.x.x:xxxxx'],
  'proxy2' => ['host' => 'x.x.x.x:xxxxx', 'auth' => 'user:pass']
];
Testing the proxy service
The best way to test if the proxy service is working is by fetching a page which shows you the IP address making the request. We’ll use myexternalip.com here. If you load that now, it should show you the IP address associated with your current connection.
When using our software without a proxy service, the IP address shown from such a page will be the IP address of the server running Full-Text RSS or Feed Creator. When the same request goes through a proxy service, the IP address shown will be one connected to the proxy service, not your server.
Testing Full-Text RSS
- Enter the URL
https://myexternalip.com/into the URL field in Full-Text RSS and hit ‘Create Feed’ - You should see the IP address of the server Full-Text RSS is hosted on in the results:
“My External IP address – [your server IP]” - Edit the Full-Text RSS URL in your browser’s address bar based on the instructions in the previous section, so the final URL will look something like:
.../full-text-rss/makefulltextfeed.php?url=myexternalip.com&proxy=stormproxies - Now you should be shown a different IP address:
“My External IP address – [IP associated with proxy service]”
When testing Full-Text RSS with pages that show you the IP address making the request, be aware that Full-Text RSS only returns content when it can extract what it determines is the main content element on a page. It’s designed for web articles such as news stories and blog posts, so will typically look for clues, such as a series of paragraphs, to help it identify the article body. When used on pages that aren’t structured like a text article, it often won’t find a suitable element and won’t return a result at all. You’ll instead see the message ‘[unable to retrieve full-text content]‘. At the time of writing, it is able to extract from the myexternalip.com page used in the steps above.
Some sites, such https://api.ipify.org and https://ip.seeip.org will simply return the IP as text with zero HTML. To get Full-Text RSS to display these, you should use &debug=rawhtml in the request, e.g.: .../full-text-rss/makefulltextfeed.php?url=api.ipify.org&proxy=stormproxies&debug=rawhtml
You’ll then see the HTTP response from the server, including the IP address at the bottom.
Testing Feed Creator
- Enter the URL
https://myexternalip.com/into the URL field in Feed Creator and hit ‘Preview’ - You should see the IP address of the server Feed Creator is hosted on in the results:
“My External IP address – [your server IP]” - Click the RSS Feed button to load the RSS feed in your browser
- Edit the URL in your browser’s address bar based on the instructions in the previous section, so the final URL will look something like:
.../feed-creator/extract.php?url=myexternalip.com&proxy=stormproxies - Now you should be shown a different IP address:
“My External IP address – [IP associated with proxy service]”
If you’re using the rotating proxy service from Storm Proxies as described in this guide, the IP address you see connected to the proxy service won’t be the IP address of the gateway you entered in the configuration file. It will be different, and should change on each request (provided you’ve not enabled caching in Full-Text RSS/Feed Creator).