
Earlier we posted about how to migrate a blog to WordPress using an RSS file. In this post we’ll look at how to migrate a Jekyll blog to WordPress using an RSS file generated by Jekyll.
We’ll also briefly cover how to set up redirects from your old post URLs to their new WordPress home.
This guide is based on our own recent experience moving our Jekyll blog over to WordPress.
What you’ll need
- Access to your Jekyll site (so you can add files and build it)
- Access to the WordPress site you’re moving to
- The WP All Import WordPress plugin
Before we begin, we want to distinguish here between an RSS feed, which your Jekyll blog might already have, and an RSS file for exporting all your blog posts.
Your RSS feed is intended for your readers to consume via their feed reader. It typically contains 10 or so of the latest posts. If you have one of these, don’t make any changes to it. (Our Jekyll blog produced one called feed.xml.) We’re going to be generating another file (export.xml) for the purpose of exporting all your blog posts.
Images and categories not included
In our case, we had mostly text posts. For the posts which did have images, we moved them over manually. So the solution we describe here won’t be moving your image files over to WordPress.
We also didn’t use categories or tags in Jekyll, so we won’t be covering that aspect here either, but you can probably figure out how to preserve categories/tags by finding the right fields in WP All Import under the Taxonomies, Categories, Tags section.
Step 1: Create RSS file in Jekyll for exporting all posts
We’ll start by using an RSS template for Jekyll provided by David Lynch. Create an export.xml file in the root of your Jekyll site with the following content:
---
layout: null
---
<?xml version="1.0" encoding="UTF-8"?>
<rss version="2.0" xmlns:atom="http://www.w3.org/2005/Atom">
  <channel>
    <title>{{ site.title | xml_escape }}</title>
    <description>{{ site.description | xml_escape }}</description>
    <link>{{ site.url }}{{ site.baseurl }}/</link>
    <atom:link href="{{ "/feed.xml" | prepend: site.baseurl | prepend: site.url }}" rel="self" type="application/rss+xml"/>
    <pubDate>{{ site.time | date_to_rfc822 }}</pubDate>
    <lastBuildDate>{{ site.time | date_to_rfc822 }}</lastBuildDate>
    <generator>Jekyll v{{ jekyll.version }}</generator>
    {% for post in site.posts %}
      <item>
        <title>{{ post.title | xml_escape }}</title>
        <description>{{ post.content | xml_escape }}</description>
        <pubDate>{{ post.date | date_to_rfc822 }}</pubDate>
        <link>{{ post.url | prepend: site.baseurl | prepend: site.url }}</link>
        <guid isPermaLink="true">{{ post.url | prepend: site.baseurl | prepend: site.url }}</guid>
        {% for tag in post.tags %}
        <category>{{ tag | xml_escape }}</category>
        {% endfor %}
        {% for cat in post.categories %}
        <category>{{ cat | xml_escape }}</category>
        {% endfor %}
      </item>
    {% endfor %}
  </channel>
</rss>
If you now build your Jekyll site, you should have a new export.xml file with all your post content inside it.
Step 2: Add a slug element
In our case, a post URL in Jekyll looked like the following: https://blog.fivefilters.org/[YYYY]/[MM]/[DD]/[slug].html. A slug is a human-readable identifier for your post, often used instead of an ID. For example:
OLD URL: https://blog.fivefilters.org/2020/12/19/feed-control.html
In the WordPress site, the permalink structure is: https://www.fivefilters.org/[YYYY]/[slug]/. So the URL above, after the move, should be:
NEW URL: https://www.fivefilters.org/2020/feed-control/
We want to preserve the slug (‘feed-control’ in the example) so that the new post URLs look similar to the old ones. If we use the same slug, it will also allow us to set up redirects more easily, so anyone accessing an old URL will automatically reach the right post.
Slug uniqueness
WordPress requires that slugs be unique for all posts, regardless of the permalink structure you use. WordPress will modify your slug if it’s already used in another post. Jekyll does not enforce this kind of uniqueness. So two posts with the same slug in Jekyll (e.g. 2019/01/01/update.html and 2020/01/01/update.html) won’t have the same slug in WordPress.
The date parts in the URL will be handled automatically by WordPress based on the post date (<pubDate> element in the template).
To make it easier to use the slug when importing the post data in WordPress, edit the export.xml file created in the previous step and add the following line somewhere inside the <item> element.
<slug>{{ post.slug }}</slug>Here’s what it might look like:
---
layout: null
---
<?xml version="1.0" encoding="UTF-8"?>
<rss version="2.0" xmlns:atom="http://www.w3.org/2005/Atom">
  <channel>
    <title>{{ site.title | xml_escape }}</title>
    <description>{{ site.description | xml_escape }}</description>
    <link>{{ site.url }}{{ site.baseurl }}/</link>
    <atom:link href="{{ "/feed.xml" | prepend: site.baseurl | prepend: site.url }}" rel="self" type="application/rss+xml"/>
    <pubDate>{{ site.time | date_to_rfc822 }}</pubDate>
    <lastBuildDate>{{ site.time | date_to_rfc822 }}</lastBuildDate>
    <generator>Jekyll v{{ jekyll.version }}</generator>
    {% for post in site.posts %}
      <item>
        <title>{{ post.title | xml_escape }}</title>
        <description>{{ post.content | xml_escape }}</description>
        <pubDate>{{ post.date | date_to_rfc822 }}</pubDate>
        <link>{{ post.url | prepend: site.baseurl | prepend: site.url }}</link>
        <slug>{{ post.slug }}</slug>
        <guid isPermaLink="true">{{ post.url | prepend: site.baseurl | prepend: site.url }}</guid>
        {% for tag in post.tags %}
        <category>{{ tag | xml_escape }}</category>
        {% endfor %}
        {% for cat in post.categories %}
        <category>{{ cat | xml_escape }}</category>
        {% endfor %}
      </item>
    {% endfor %}
  </channel>
</rss>
Note: <slug> is not part of the RSS spec. If you validate this file, it will fail. But we’re only using this for export/import operations, so we don’t need to worry about generating a pure RSS file.
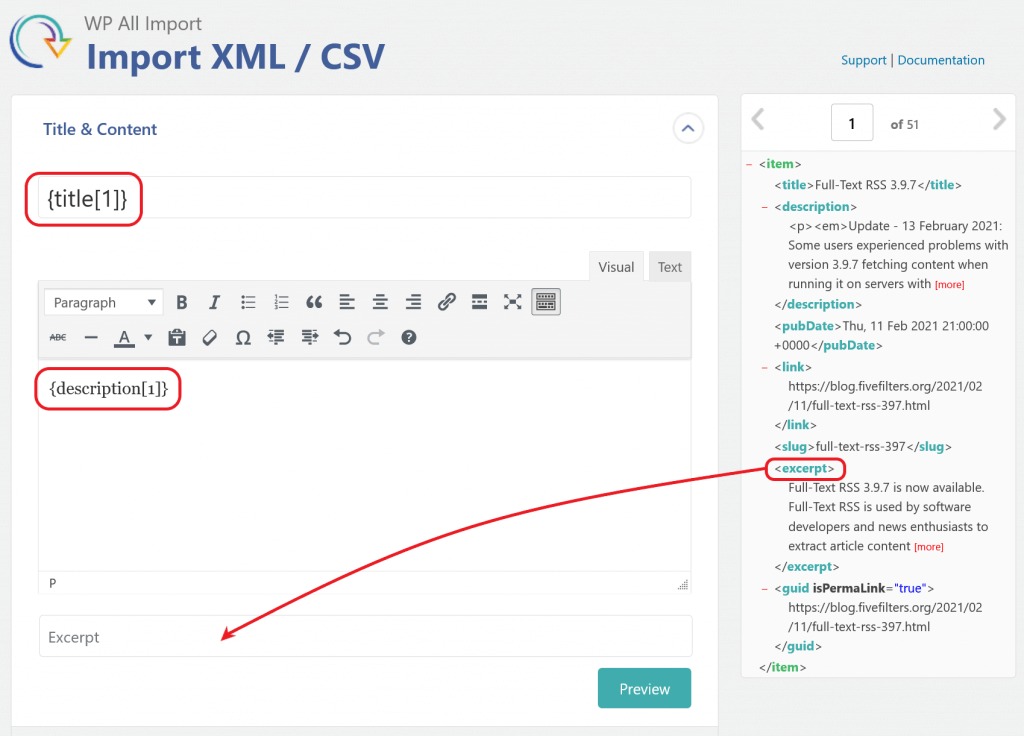
Step 3: Add excerpt element (optional)
If you’ve used excerpts in Jekyll which you’d like to move over to WordPress, add the following element inside <item> (in a similar way you added <slug>).
<excerpt>{{ post.excerpt | xml_escape }}</excerpt>Step 4: Build the Jekyll site and download export.xml
With the export.xml template file in place, build the Jekyll site so it produces the file with all the posts. You should be able to access it at http://jekyll.example.com/export.xml.
Save this file on your computer for use in the next step.
Step 5: Import the file in WordPress using WP All Import
At this point you should follow our guide, How to move your blog to WordPress using RSS, until Step 4: Drag and drop post title and content.
Complete the step, but notice that you won’t have a <content_encoded> element on the right. The export.xml file Jekyll generated contains the full post content inside <description>, so that’s what we copy over into the content field.
If you added an <excerpt> element to export.xml (step 3 above), you can now copy that over into the excerpt field too.
Step 6: Drag and drop post slug
Now scroll down to the “Other post options” section and click the heading to expand it. Here you can copy over the slug in the same way.
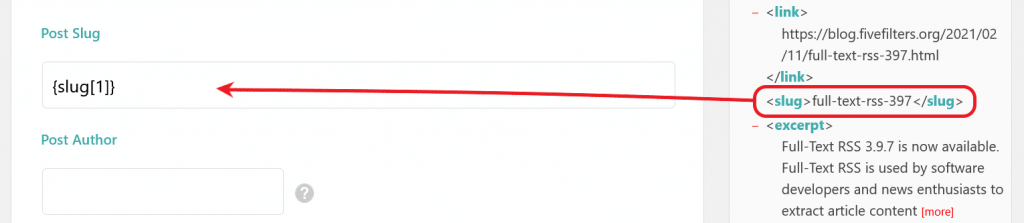
Duplicate slugs?
Earlier we noted that posts in Jekyll can have the same slug, but slugs in WordPress have to be unique (they’ll be re-written otherwise). If this is an issue for you, you might want to construct the slug in the Post Slug field in such a way so that when you create the redirect rules from the old permalink structure to the new, you can still reach the right post. This could mean including the date of the post as part of the slug.
Step 7: Continue with import
You should now continue with the previous guide from Step 5: Drag and drop post date.
Step 8: Set up redirects
To avoid users getting 404: File Not Found messages when accessing your old blog post URLs, we want to set up some redirects.
We saw earlier that our old Jekyll URLs looked like this:
https://blog.fivefilters.org/2020/12/19/feed-control.html
The same post on the new site is now at:
https://www.fivefilters.org/2020/feed-control/
Before we point the blog address over to the new WordPress site, we want to make sure someone accessing an old blog post URL will reach the new address. We’ll use regular expressions to do this. You can do this on the web server level (e.g. with Apache or Nginx) or use a WordPress plugin like Redirection.
Request URL pattern: ^/(\d{4})/\d{2}/\d{2}/([^.]+).html
Target URL: /$1/$2
The regular expression in the request URL pattern above will match the following URLs and capture the segments in bold:
- https://jekyll.example.com/2020/12/19/feed-control.html
- https://jekyll.example.com/2020/12/28/feed-control-comparison.html
- https://jekyll.example.com/2019/07/26/push-to-kindle-safari.html
The target URL will use the captured data to construct a new URL and redirect the visitor to it. For the URLs above, the new URLs constructed will be:
- https://wordpress.example.com/2020/feed-control/
- https://wordpress.example.com/2020/feed-control-comparison/
- https://wordpress.example.com/2019/push-to-kindle-safari/
If your Jekyll blog has a web feed (e.g. at http://jekyll.example.com/feed.xml), you’ll want to redirect that too to its WordPress counterpart (usually at http://wordpress.example.com/feed/).
Feed disruption
If your Jekyll blog has a feed with subscribers, after redirecting the feed to WordPress, some of your subscribers might see recent posts that they’ve already read show up as unread because of how the guid is produced in WordPress.
Done!
Hopefully everything went well and your new blog is now up and running.
We recommend that you keep a full backup of your Jekyll site. It may contain additional data that you may need in the future.
Discuss
Please share any feedback on our forum.