In part 1 we showed you how to turn a webpage into an RSS feed using our Feed Creator application and its simple selector mode. In this post we’ll show you how to use advanced mode and CSS selectors to include additional item information such as the publication date, featured image, and summary text.
If you’re new to Feed Creator, we recommend you start by reading part 1 and then continue here.
What’s a CSS selector?
CSS is a standardised web technology primarily used for styling web page elements. As part of its specification, it includes selectors to target HTML elements to be styled. Feed Creator does not concern itself with the styling aspect of CSS, but does accept CSS selectors to help extract elements to be used in the feeds it produces.
Generating a feed from a webpage using CSS selectors
In this post we’re going to show you how to create a feed using CSS selectors, step by step. We’ll use Reuters Investigates as our source page, but the technique can be applied to any site.
Short on time?
If you’d rather have us create a feed for you, please submit a custom feed request.
What you’ll need
- Some basic knowledge of HTML and CSS selectors
- The webpage address (URL) of the source page you want to create a feed from
- Our Feed Creator application (we offer a free, hosted service to get started, no signup required – if you find it useful, it’s also available for self-hosting or as a premium, hosted service)
- Your browser’s developer tools to inspect the source page’s HTML (we’ll use Firefox’s Developer tools in this guide, but Chrome will be very similar)
Overview
These are the basic steps we’ll be following:
- Find appropriate selectors for the main item blocks
- Find appropriate selectors for individual item elements (e.g. title, date, image, summary)
- Enter the selectors in Feed Creator to generate the feed
Step 1: Make source page and Feed Creator easily accessible
We’ll be switching between the source page and Feed Creator in the steps below, so we recommend you open them in two tabs (or have the windows side-by-side).
Tab 1: Reuters Investigates – reuters.com/investigates/
Tab 2: Feed Creator – createfeed.fivefilters.org

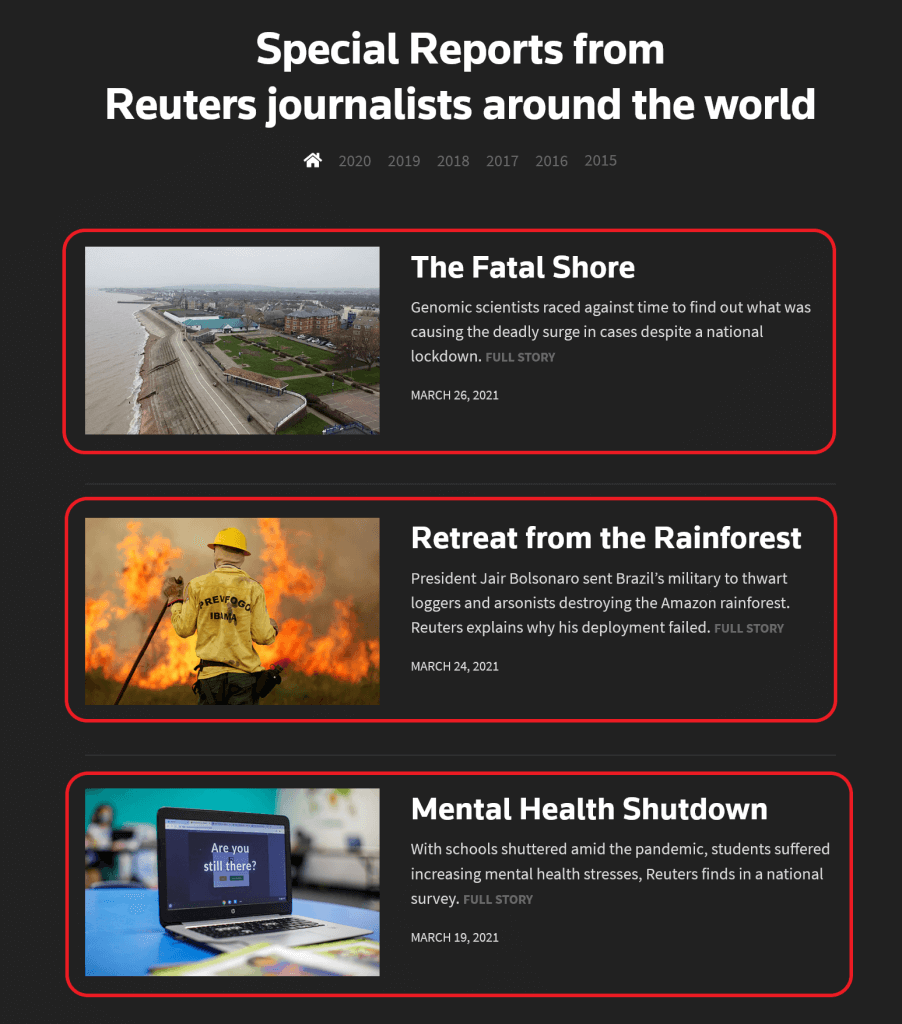
Step 2: [Source page] Identify the items that should be used in the feed
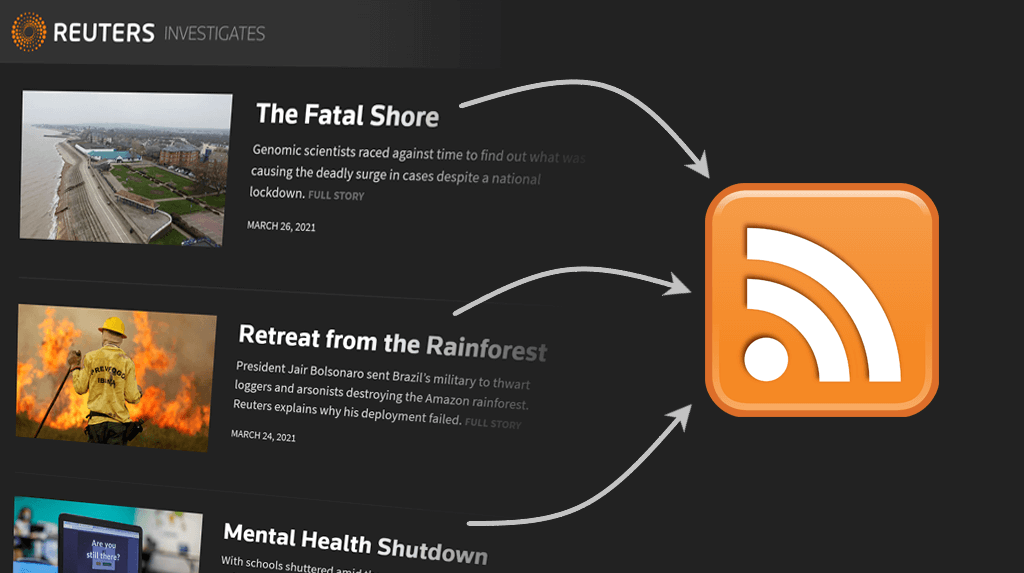
In this example we’re using the Reuters Investigates page, and the areas we’ve marked in red rectangles contain the items of interest.
Step 3: [Feed Creator] Enter the source page URL and choose Advanced Selectors
Now switch to the Feed Creator tab and enter the Reuters Investigates URL in the field labeled ‘Enter web page URL’: https://www.reuters.com/investigates/
Below it, choose ‘Advanced Selectors’

Step 4: [Source page] Create selector for the desired items
To create a usable selector, we’ll want to inspect the desired items and identify the main elements in the underlying HTML. So let’s jump back to our source page.
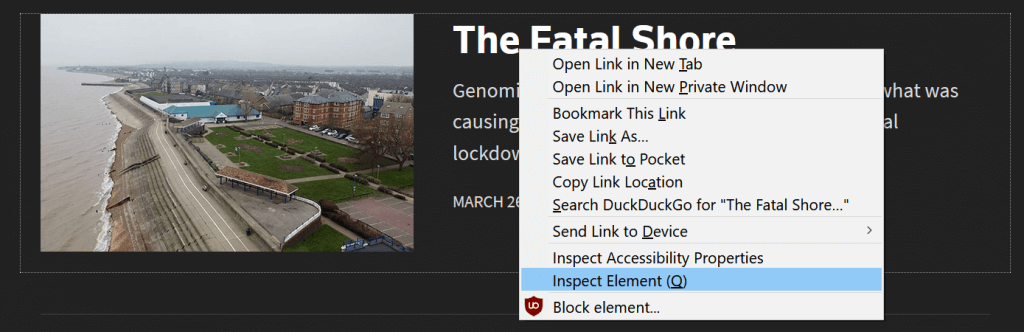
Move your cursor over one of the items and right-click and choose ‘Inspect Element’ in Firefox (‘Inspect’ in Chrome).
You’ll now see the item’s underlying HTML markup. What we’re looking for is an HTML element for a single item. Later, we will use additional selectors to target title, summary, image and date elements within each selected item.
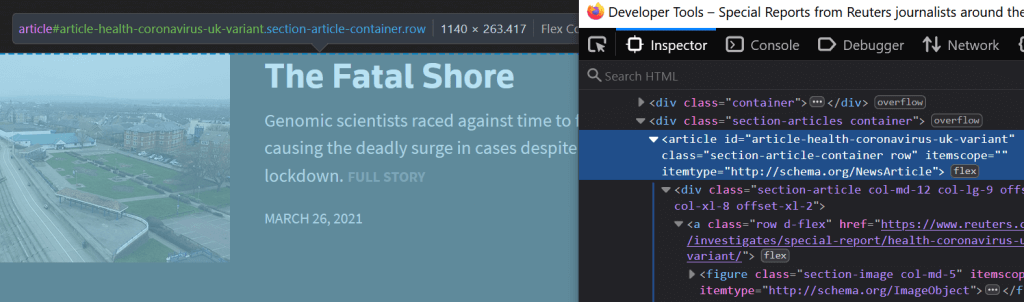
A common mistake is to identify an element that contains all the items and to create a selector for that. For example, the parent element of the highlighted <article> element in the image above is such an element, so targeting it with div.section-articles would be selecting a single element. That’s not what Feed Creator expects as the item selector (unless there’s only ever a single item on the page).
We have a number of options here for choosing a suitable CSS selector:
articleto select all <article> elements on the pagearticle.section-article-containerto select all <article> elements with a class attribute containing “section-article-container”div.section-articleto select all <div> elements with a class attribute containing “section-article”
Javascript-generated elements
At the moment Feed Creator only works with HTML elements that are returned by the server in its initial response. Some sites rely on Javascript to construct elements and sometimes pull in the desired items via additional requests after the page has loaded in your browser. When you inspect elements using your browser’s developer tools, as we’re doing here, you’re seeing the final result after Javascript execution. This might not be what Feed Creator sees when it processes the page.
The easiest way to make sure you’re not using attributes that Feed Creator cannot see is to disable Javascript in your browser temporarily. In Firefox’s developer tools, you can disable it temporarily in the settings panel (F1 to toggle) and ‘Disable Javascript’ in the ‘Advanced Settings’ section. There’s a similar setting in Chrome. You can then inspect elements using your browser’s developer tools.
Step 5: [Source page] Ensure selector targets all desired items
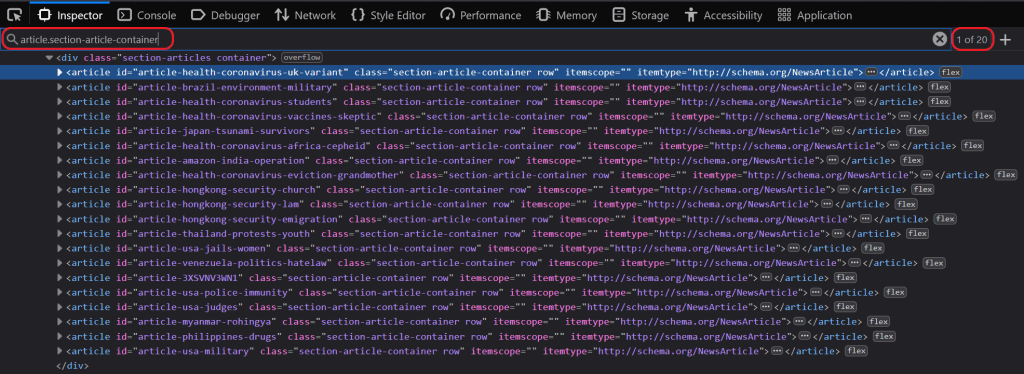
We want the selector we choose to match all the elements we want, and nothing more. An easy way to test this is to enter the selectors, one by one, into the Search HTML field in developer tools (CTRL+F in Chrome to bring up the search field).
Both Firefox and Chrome will show you how many elements are selected by the selector and will allow you to move through them by hitting Enter.
The HTML search field in developer tools is not exclusively for CSS selectors, so when entering ‘article’, Firefox will also find instances of the text ‘article’ wherever it appears in the HTML. To avoid this, change the input to something that more resembles a CSS selector, such as by adding ‘html’ before the selector: ‘html article’. This will find all <article> elements within the root <html> element, essentially the same CSS selector as just ‘article’.
Another option is to open the console in developer tools with CTRL+Shift+K (CTRL+Shift+J in Chrome) and enter your CSS selector in a call to $$(), for example: $$('article'). You will then see a list of selected elements which you can hover over to highlight on the page or click into to view in the element inspector panel.
All three selectors listed in the previous step match the content we want on the page, so we could go with any one of them. When deciding which selector to use, we like to consider the likelihood of a selector matching more than we want in the future, or a completely different set of items in the case of a site redesign. That’s more likely to happen with article (for example, an element <article class="related"> could get added at some point in the future) than with the more targetted article.section-article-container or div.section-article. In situations like this, we’d pick one of the latter two.
We’d also caution against going too far in the other direction and choosing a very specific selector, such as section.main div.section-articles article.section-article-container, this will also match the items we want, but now we’ve made our selector quite brittle by being overly reliant on the HTML structure of the page as it is now.
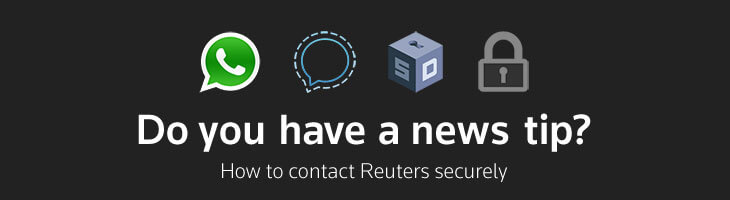
So far we’ve found selectors which match the content we want, but before we move on, let’s make sure they don’t match items we don’t want. If you scroll down on the page, you will see one of the elements selected, rather than containing an investigative piece from Reuters, contains an image with the text “Do you have a news tip? How to contact Reuters securely”.
That’s not something we want selected, so let’s consider the ways we can remove it in Feed Creator.
Step 6: [Source page] Removing unwanted elements
In part 1, we saw that Feed Creator allows us to use CSS selectors to remove HTML elements. In addition to that, now that we’re in advanced mode, we can modify our CSS selector itself to be more specific about what what we want. We can also use Feed Creator’s URL filtering to remove items if they have a particular URL segment. We’re going to look at all these approaches now.
The first thing we want to do is to inspect the unwanted element, as we’ve done before, to see what we can work with:

There’s a lot of similarity between the element names and attributes inside this unwanted item and the other items that we do want to keep.
Here are some difference:
- The unwanted item contains an id attribute with value “article-3XSVNV3WN1”
- The unwanted item URL contains the segment “/tips/” at the end: https://www.reuters.com/investigates/special-report/tips/
And here are three ways of using these differences to remove this item from the results:
- Using ‘Enable cleanup’ in Feed Creator and adding the CSS selector:
#article-3XSVNV3WN1 - Changing our item selector to exclude the unwanted item, e.g.
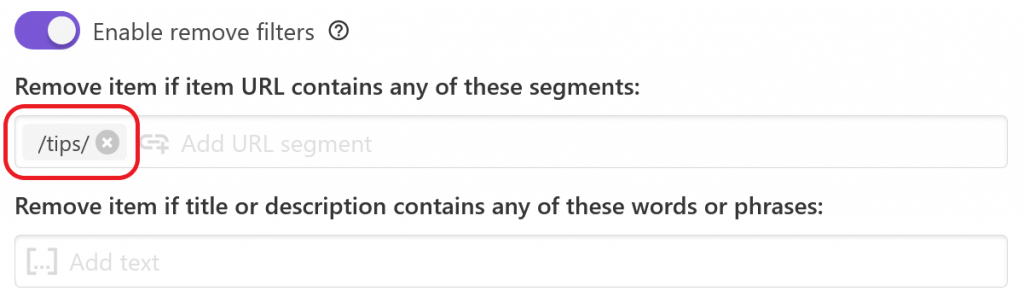
article.section-article-container:not(#article-3XSVNV3WN1) - Using ‘Enable remove filters’ in Feed Creator and adding the URL segment:
/tips/
Our recommendation is to be cautious when using attribute values that contain a sequence of letters and numbers, as they’re often a sign that the value is randomly generated and could change in subsequent versions of the page. Sure enough, if we check the Internet Archive for previous versions of this page, we’ll see the code in this id attribute (3XSVNV3WN1) does indeed change, and therefore isn’t suitable as part of a selector.
Step 7: [Feed Creator] Add item selector and enable remove filters
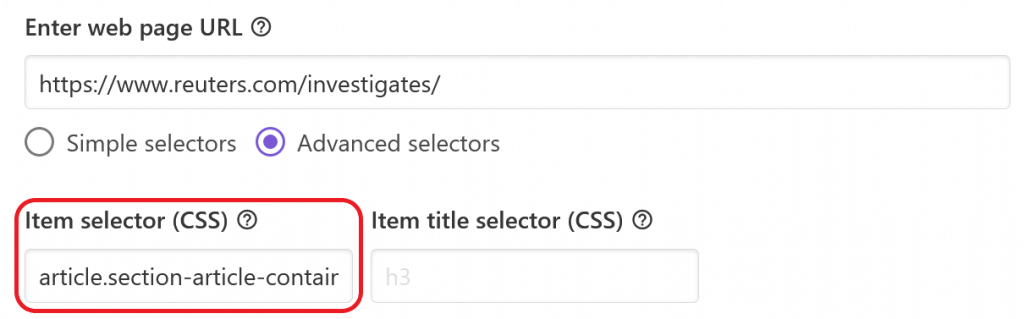
Let’s use what we have so far and enter it into Feed Creator. Find the field labeled ‘Item selector (CSS)’ and enter: article.section-article-container.
Next, scroll down until you see the ‘Enable remove filters’ toggle and switch it on. In the field labeled “Remove item if item URL contains any of these segments:”, enter /tips/ and hit Enter.
Hit preview now to make sure Feed Creator returns results.
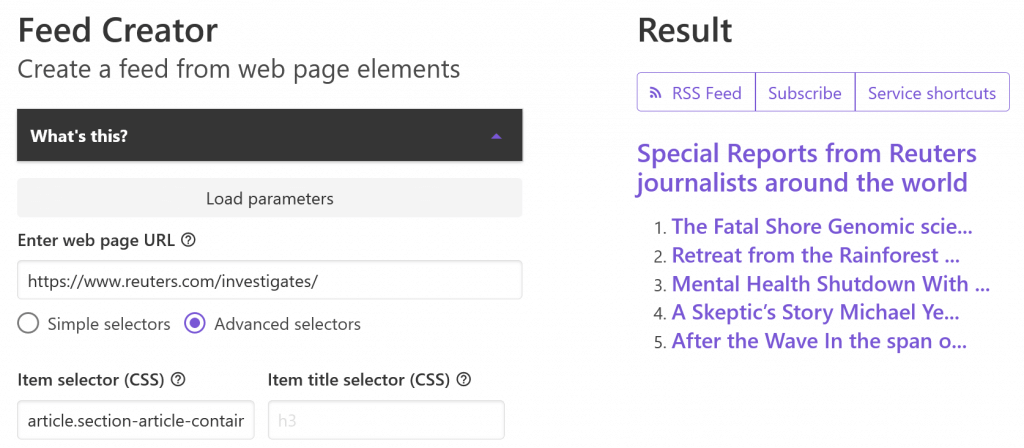
The free version of Feed Creator only returns the latest 5 items, so you won’t see any difference in results if you enable/disable the remove filter becuase the item we want removed is not one of the first 5 items on the page.
Step 8: [Source page] Create selectors for additional elements
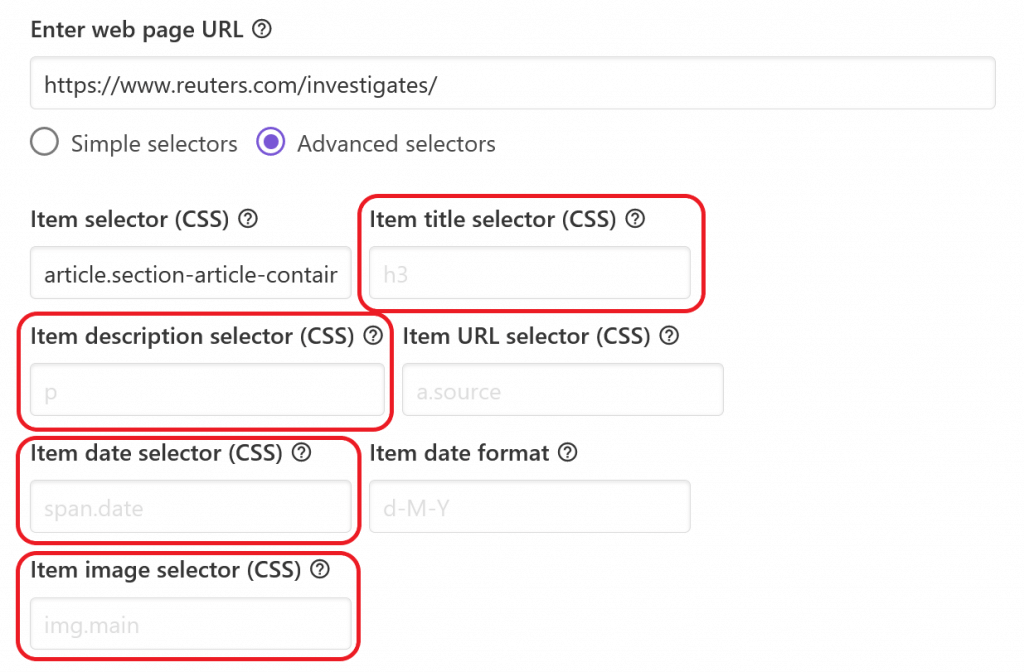
Now that we’ve got a feed with the items we want included, let’s expand it to include each item’s publication date, image and summary text. We’ll also be explicit about targetting the title element. Feed Creator provides fields for you to enter additional selectors for these.
Before we get started, you should be aware of some differences between the main item selector (the one we used in step 7) and the ones we’re going to use now:
- The main item selector is applied within the context of the entire page
- The selectors here are applied within the context of the items selected by the main item selector
- The main item selector is intended to select multiple items
- The selectors here will only select the first matching item
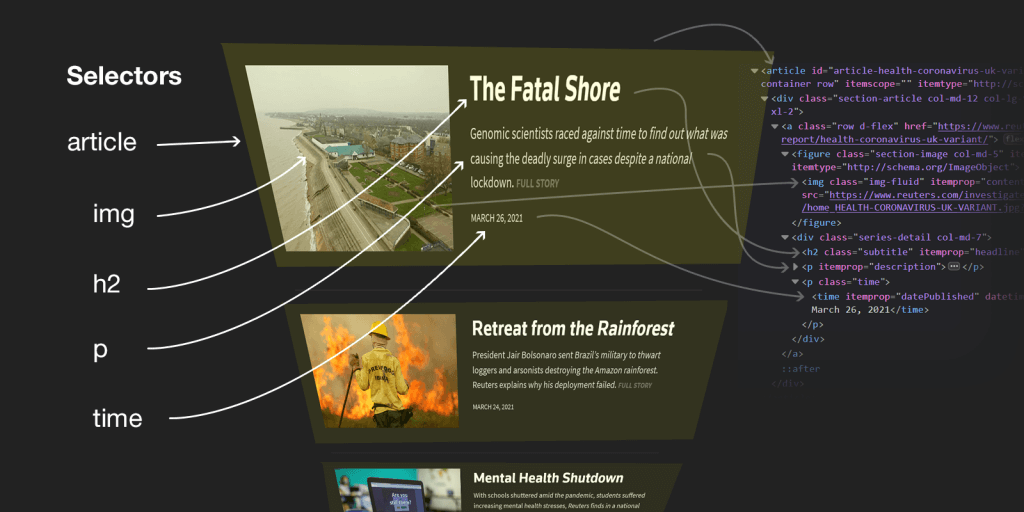
How do we find these additional selectors? The same way we did before: by inspecting an item in the browser to find suitable selectors to target the information we want.
Item title selector (CSS)
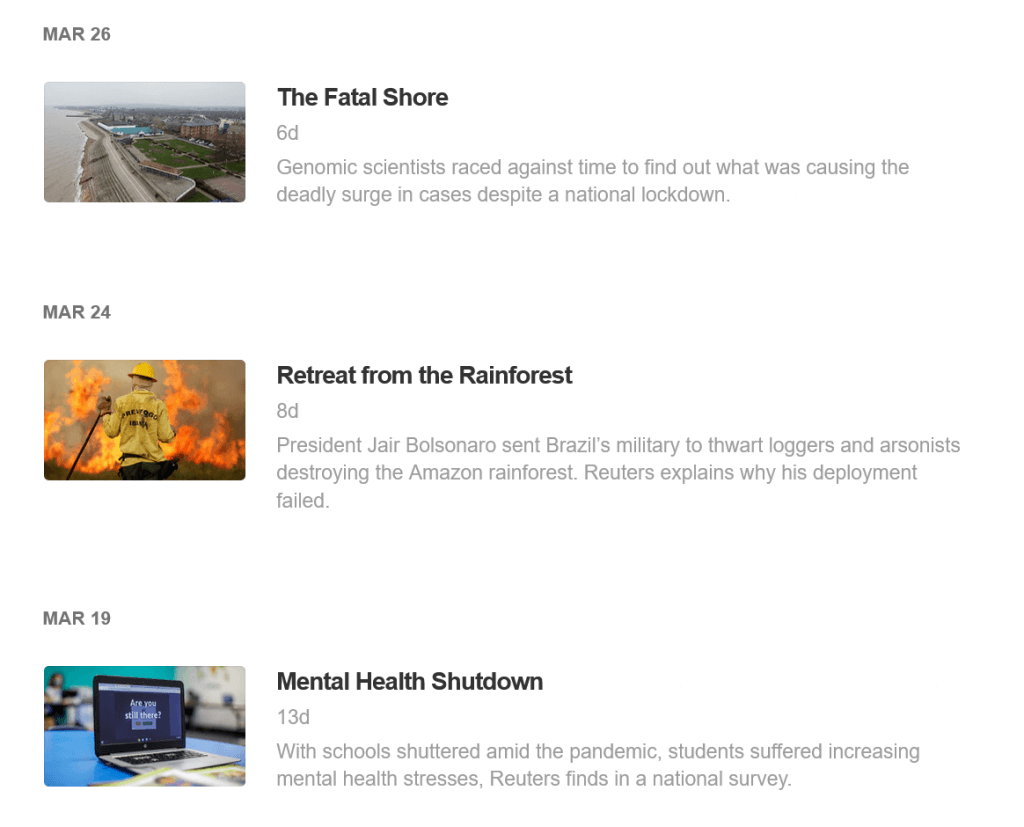
Item titles are in <h2> elements on this page:
<h2 class="subtitle" itemprop="headline">The Fatal Shore</h2>Feed Creator selector: h2
Alternatives:
.subtitleh2.subtitleh2[itemprop="headline"]
Item description selector (CSS)
Item summaries are in <p> elements:
<p itemprop="description">Genomic scientists raced against time to find out what was causing the deadly surge in cases despite a national lockdown. <span class="tail">Full Story</span></p>Feed Creator selector: p
Alernatives:
p[itemprop="description"]*[itemprop="description"]
You can remove the “Full Story” text in the HTML above by using the HTML cleanup feature of Feed Creator and adding .tail or span.tail.
If there’s no description available, and you’d like to have one, you can ignore it for now and later pass the generated feed to our Full-Text RSS application via the Service Shortcuts button in Feed Creator. Full-Text RSS can recreate the feed by pulling in additional data for each item.
Item date selector (CSS)
Item dates are in <time> elements:
<time itemprop="datePublished" datetime="2021-03-26T11:00:00+00:00">March 26, 2021</time>Feed Creator selector: time
Alernatives:
time[itemprop="datePublished"]time[datetime]time @datetime(Not a pure CSS selector, the @ part is Feed Creator-specific, see below)
Feed Creator lets you select attribute values using @attribute-name at the end of the selector. To select the more computer-readable datetime attribute, we could enter: time @datetime
If a site doesn’t display the date and you’d like it included in the generated feed, you can ignore the date for now and pass the generated feed without a date to our Feed Control service. In there you can tell Feed Control to generate a new feed and use the date it detects each new item as the item’s publication date.
Item image selector (CSS)
Item images are in <img> elements:
<img itemprop="contentURL" class="img-fluid" src="https://www.reuters.com/investigates/special-report/assets/section-leads/homepage/health-coronavirus-uk-variant/home_HEALTH-CORONAVIRUS-UK-VARIANT.jpg?v=010214260321">Feed Creator selector: img
Alternatives:
img.img-fluidimg[itemprop="contentURL"]
Feed Creator will show an [image] link in the preview if it successfuly finds a URL using the selector. The selected image appears inside the feed output in three places: as a <media:content> element, an <atom:link rel=”enclosure”> element, and embedded inside the <content:encoded> element as an HTML <img> element.
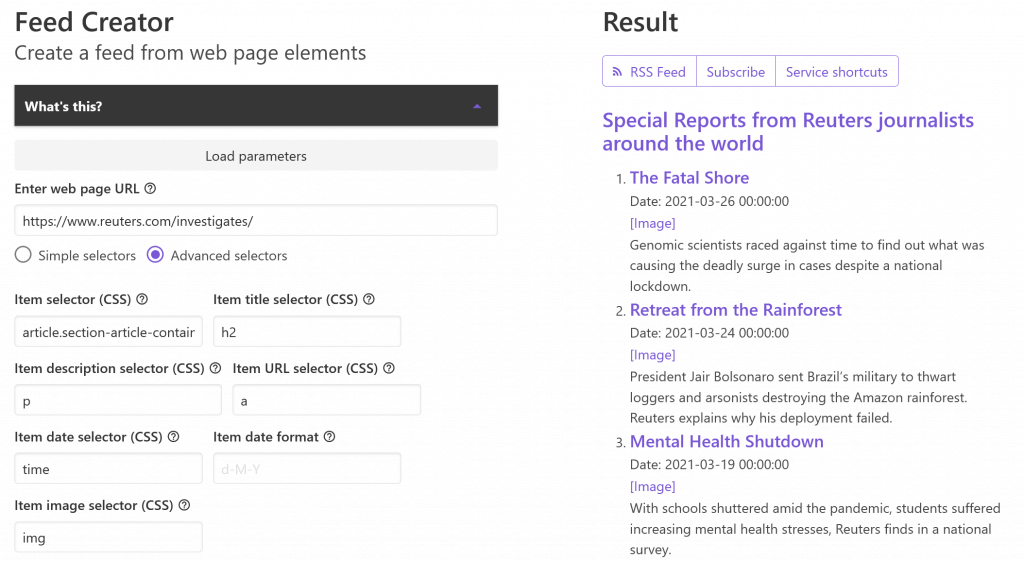
Step 9: [Feed Creator] Enter additional selectors and preview the feed
Now we just need to enter the selectors identified in the previous step into Feed Creator. Once you do, hit Preview to see the results. You should see something like this:
Feed Creator’s preview links to the images, without displaying them, but they are included in the feed. For example, here’s how Feedly shows the feed we just generated:
Done!
You can now use the buttons Feed Creator provides in the Result column to use your generated RSS feed in other applications. If you subscribe to the feed in a news reading application, you’ll be notified when new items are published.
The RSS feed button will load the feed in your browser or prompt you to open it in a supporting application (if you have one installed). You can copy the generated feed URL by right-clicking this button and choosing ‘Copy link location’.
The Subscribe button will open a panel with a list of feed readers. If you see one you use, click its name and we’ll pass the generated feed into the feed reader so you can subscribe to it and be notified of new items.
The Service shortcuts button opens a panel with shortcuts to some of our other applications that can take a feed as input. You can choose ‘RSS with full text’, for example, to have the generated feed passed to our Full-Text RSS application which will expand the feed by pulling in the article content for each item.
That’s it. To recap, we used Feed Creator to turn a webpage into an RSS feed by extracting elements from the source page (Reuters Investigates in this example) using CSS selectors. You should now be able to apply the same technique to almost any page you like.
What about future changes to the source site?
What we’ve done by using selectors is to ensure that new items published on the site will automatically be included in our feed. But what if the structure of the site changes in such a way that our selectors no longer match the items? If that happens you’ll find your feeds will stop picking up new items and you will have to update your CSS selectors to match the new structure of the page.
Feed Creator generates feeds by embedding the entered CSS selectors and filters in its feed URLs, e.g.:
https://createfeed.fivefilters.org/extract.php?url=https%3A%2F%2Fwww.reuters.com%2Finvestigates%2F&item=article.section-article-container&strip_if_url[]=%2Ftips%2FTo edit an existing feed, copy its URL into your browser and change ‘extract.php’ to ‘index.php’:
https://createfeed.fivefilters.org/index.php?url=https%3A%2F%2Fwww.reuters.com%2Finvestigates%2F&item=article.section-article-container&strip_if_url[]=%2Ftips%2FFeed Creator will now load all your selectors from your feed into its interface and allow you to make changes.
After making changes, you’ll have a new feed URL with new selectors, so you’ll also have to update the previous feed URL wherever it was used before.
If you use the feed in multiple places, or don’t have easy access to update its URL after it’s changed, you can add your Feed Creator feeds to Feed Control first and use its generated feeds instead. You can then make changes to the source feed URL in Feed Control without needing to update the feed URL that Feed Control produces.
Browser extensions to help you find and test CSS selectors
This guide has shown you how to use your browser’s built-in page inspector tools to find and test suitable CSS selectors for Feed Creator. There are also browser extensions available to make the task a little easier. If you’re curious, you can have a look at the following:
- Try XPath for Firefox lets you enter a CSS selector (choose querySelectorAll in the “Way” dropdown) and see all matching elements highlighted with red dashed borders.
- Easy Select for Firefox and Chrome extends the browser’s developer tools to make the task of creating a suitable CSS selector easier. You can add class attribute values to your selector easily and instantly get an updated count of selected elements, as well as the option of having them highlighted.
- SelectorGadget for Chrome lets you find a CSS selector by pointing and clicking on elements on the page.
Discuss
Please share any feedback or questions on our forum.